Recently, my wife’s many-years-old Keurig stopped working. Like any engineer/hacker/maker, my first instinct was to poke around, clean out certain parts, etc. to see if I could fix it, and after some time I did get coffee flowing once again. Along the way, however, I noticed that it was rather nasty inside, and that these machines are not made to be easily be taken apart and serviced. Normally, I’d say this is a bad thing, but when dealing with water plus enough electrical current to raise water to a very high temperature, one can understand why it was made in such a way.
So, it was a time for a new unit, which actually looks quite nice on our counter now. The old one, however—with a water tank and means for dispensing it—seemed like a perfect hacking target to turn into a sort of Pi-based gardening setup!
Raspberry Pi Greenhouse Automation
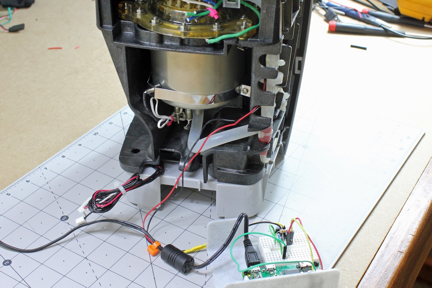
As noted earlier, these devices are not meant to be user-serviceable. While there were some screws in logical positions, I eventually had to resort to destructively prying things apart with a screwdriver to get the back cover off. After quite a bit of disassembly work, I found what I needed: a water tank, a pump to move said water around, and a controls chamber that, with the original electronics removed, had enough room for a Raspberry Pi Zero W and small breadboard.
After some testing and observation, it was apparent that the pump motor pushes positive air pressure into the tank, eventually dripping water out of the former coffee dispenser nozzle in response. I was able to get it working with a benchtop power supply at 5V, with a current draw of less than 40mA, meaning it could be easily controlled with the Pi and a transistor.
Raspberry Pi Plant Watering System
To turn this Keurig into a Raspberry Pi-powered watering device, you’ll need the following components:
· Raspberry Pi Zero W
· 2N2222 transistor
· 170 tie point breadboard
· 270 & 10k ohm resistor
· Jumper wires
When working on any electronics project, be sure you take the appropriate precautions. Make sure it’s unplugged when making changes.
Setting Up Raspberry Pi Zero W
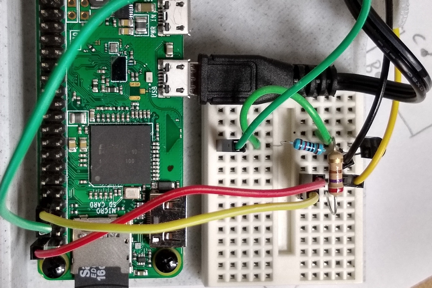
With a clean SD card, download the latest version of Raspbian Lite and image it onto an SD card for your Pi with Balena Etcher or a similar program. Log on with Username: pi and password: raspberry, then set it up to work on your network with sudo raspi-config. Here you’ll also want to change the time zone, update the password to something non-default, and enable SSH.
We’ll be using cron and BCP pin 14 (physical pin 8) to drive the dispensing motor for a set amount of time every day. More background on this excellent service is found here.
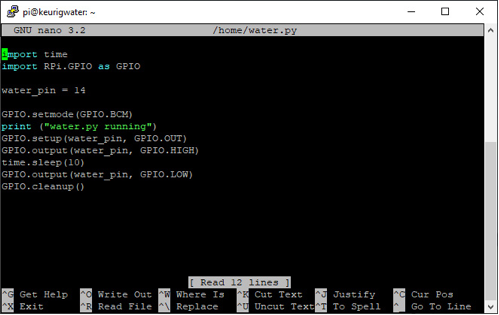
When logged in, create the text file shown above with sudo nano /home/water.py. After this is saved, enter python3 /home/water.py to try it out. The Pi won’t give you any physical result at this point, but the GPIO pin will be turned on, and your terminal will output “water.py running.” If this doesn’t initially work, you may need to enter sudo apt-get update then sudo apt-get install python3-rpi.gpio to ensure your system has the correct packages available.
Transistor Motor Control Circuit
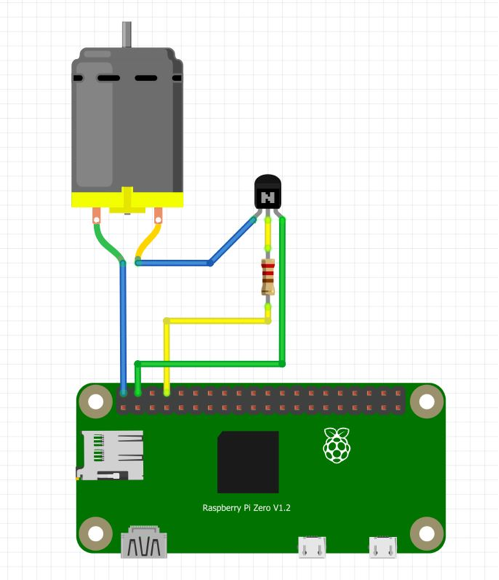
A 10K pulldown resistor is also a good idea here
To control the pump motor, wire it as shown in the Fritzing diagram above. The 2N222 transistor is used for switching, and a 270-ohm resistor is applied between the Pi and the transistor’s base to limit the current input. It’s also a good idea to pull the base of the transistor to ground with a 10k resistor or similar, so as to avoid any errant behavior (not shown in the diagram). With everything connected, output 14 controls the motor via the transistor with one of the Pi’s 5V pins.
Control Water Pump with Raspberry Pi
With this new circuitry installed, add water to the Keurig reservoir and activate python3 /home/water.py yet again. You should hear the motor cranking away, and water will drip out of its spout, similar to coffee in normal circumstances. You may have to repeat this a few times the first time you add water. For a remote interface, find the Pi’s IP address with a scanner program, then log on via SSH. You can then run the watering routine remotely, meaning you only have to approach the plant for intermittent fill-ups.
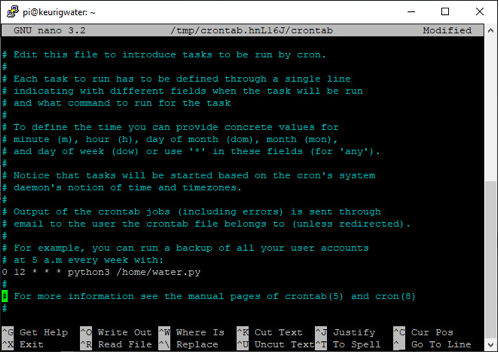
Water at 12:00 PM every day.
Of course, if you have to log on and type in something every time your plant needs water, such a setup is little more than a clever gimmick—or perhaps you could frame it as a “learning experience.” To let your Pi take care of watering for you, enter crontab -e to edit how the Pi executes programs automatically at a set time. The first time you run this program, it’ll ask what editor you’d like to use. I suggest you select 1 for nano, though the other options are probably fine.
Once in, edit the crontab to your liking, setting up a watering schedule. What’s shown in the image above will activate watering at 12:00 PM every day, but you can get much more granular with how things work. Going further, you could even set up a schedule to turn on a light at a calculated interval to tell you that it’s time to refill the tank. Of course, it would be even better if it could instead sense if the plant is actually getting watered...
Raspberry Pi Greenhouse: Next Steps
What’s outlined here produces a very basic watering device out of a Keurig coffee maker, with a Raspberry Pi Zero W acting as its timer. This is, however, only the beginning of what can be done with such a Pi/coffee maker watering setup. Join me for the second post in this series, where I outline how to stuff the new electronics inside the Keurig with a 3D-printed fixture, set up sensing capabilities, and even explore how to create an interface beyond the text-based SSH connection seen here.


