If you need to understand your blood oxygen levels, taking readings is easy and non-invasive thanks to the pulse oximeter. These devices were difficult to find a few months ago, which brought new attention to how pulse oximeters work (and if there is a DIY option). As it turns out, you can make your own pulse oximeter display using an Arduino board and the appropriate sensor setup.
Experiment: DIY Pulse Oximeter with Arduino
For a quick demonstration, we’ll be using this Pulse Oximeter and Heart Rate sensor board to interface with an Arduino Uno. It features a MAX30101 pulse oximeter and heart rate monitor module, as well as a MAX32664 biometric sensor hub that can supply raw or calculated data to another device via I2C. The Uno receives this data and passes values along to a computer via serial.
Hardware-wise, hookup is simply a matter of connecting the I2C pins appropriately (SCL > A5, SDA > A4), along with 3.3V power and ground, and two “extra” pins (RST > D4, MFIO > D5). Open up the Arduino IDE, and search for and install SparkFun Bio Sensor Hub Library under Tools > Manage Libraries… Send this demo code found here to your Arduino, and open up a serial monitor at 115200 baud.


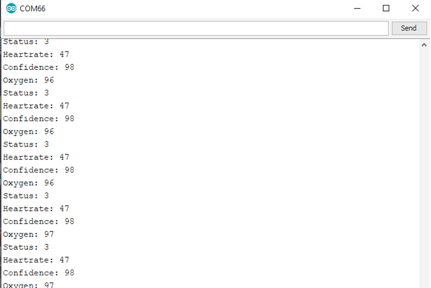
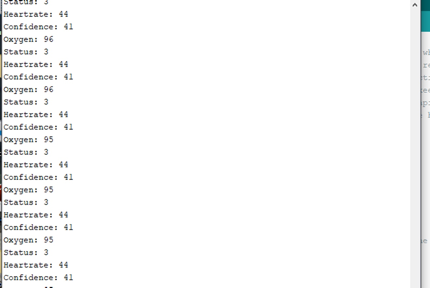
Resting heart rate (left), held breath (right)
How to Read a Pulse Oximeter
If all is connected correctly, you’ll see a scrolling display listing oxygen, heart rate, and a number indicating its confidence in the reading as a percentage. Note that oxygen levels are in units of percent peripheral oxygen saturation (or %SpO2), used to indicate how well your blood is delivering this vital gas to your body. Heart rate is measured in beats per minute. In some very limited testing against a pulse oximeter of unknown origin, stats seemed to be in the same ballpark.
Interestingly, I was able to affect the %SpO2 reading somewhat by holding my breath, though as oxygen levels decreased to around 95%, the confidence in it dipped into the 40s. My heart was reading at 44 BPM at this point, however, and normal resting heart rates are supposed to be between 60 and 100 BPM. Perhaps something was amiss, though this number is consistent for me based on both devices. Such low readings can indicate very good cardiovascular health, but, paradoxically, it can also indicate a problem. While I’m not too worried, I’m not planning to forgo my next checkup either.
Pulse Oximeter Uses and a Big Caveat
On the subject of checkups, the big caveat with this device is that it’s not intended to diagnose or treat medical conditions, so you should take what it says with a grain of salt. On the other hand, many pulse oximeters sold online will come with similar “not approved” warnings. At least with the DIY device, you know what actual sensor is driving its results.
With this data, you could theoretically hook up a device that could perform a certain action, such as blink a light if readings were out of a specified range. Or it could encourage you to get some exercise if you’ve been sitting at your desk for too long. It would even be possible to upload such readings to the cloud with an ESP8266 module in order to explore your not-quite-medical curiosity.
For other pulse oximeter options, Arrow also lists the MikroElectronika MIKROE-2510 and MICROE-2036 boards, along with the Seeed MAXREFDES117.


