Arduino boards and similar microprocessors can accomplish a wide variety of tasks. If, for example, you want to turn on an LED once per second, use the delay() or millis() commands. Unfortunately, small variations in a system's resonator or crystal oscillator may cause the board to keep uneven time.
All About Arduino SerialWhile this time variation is miniscule—a .05% (.0005x) deviation from the actual time—the lag eventually adds up. For example, if you're trying to make an alarm clock, a .05% variation would mean that your system varies from reality by 43.2 seconds per day. That won't make a difference for the first week, but when you're getting to work 20 minutes late after a month, you might start to get annoyed.
So, what is one to do? The answer, of course, comes in the form of an RTC, or real-time clock module. Options include the PCF8523 and DS1307, as well as the DS3231 chip we'll discuss below.
Connect a Real Time Clock (RTC) Module to Arduino
If you want to get started with an RTC module and Arduino, I recommend using a breakout board with the following features:
- Connections that go to the Arduino
- Holder and connections for a coin-cell (CR2032) battery
The battery keeps it ticking even without external power, so if you have to shut down the main system, it will still read the correct time when you power it back on. You can also use a real time clock module to wake your processor up at set intervals for power savings.
For this setup, hook things up as shown here on an Arduino Uno board, connecting 5V and ground to the appropriate connections, and the SDA and SCL lines to the corresponding Arduino connections. On the Uno, A4 is SDA and A5 is SCL, but the lines are also conveniently broken out here next to the reset button where they connect in the picture above. Plug in a CR2032 battery to keep the chip "ticking."


Program Your RTC Arduino Device
Here's the process:
1. Install the Adafruit RTC library through the Arduino IDE search function or via this GitHub page.
2. Navigate to File - Examples – RTClib and open ds3131.
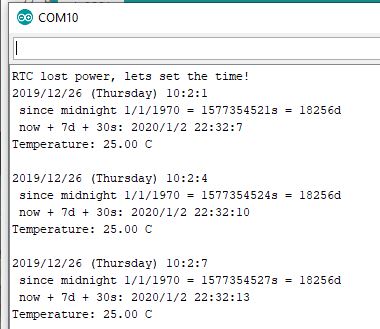
3. Open a serial monitor for feedback, then upload the program to your Arduino board.
The first time you do this, the serial monitor will note: "RTC lost power, let's set the time!" This loads the time into the real time clock module based on when the sketch was compiled. After that, it will display the current time/date, time since midnight 1/1/1970, and the temperature.
The time will generally be off by several seconds, because it gets the time from the computer when the program compiles. You can also manually set the time by adjusting the rtc.adjust line with a specific date.
If you want to input the time again, disconnect the module and remove the battery. Plug everything in again and reprogram your Arduino as described above.

Battery backup keeps the RTC module on time even when the main power is disconnected.
Clocking Your Project
Now you're ready to get started experimenting with more accurate Arduino RTC timekeeping. Try creating your own timekeeping device or automating processes around your home or business. With more development, you're free to explore endless product possibilities.


