When you use a microcontroller dev board like those made by Arduino—or even a microcontroller by itself, such as the awesomely small ATtiny85—you simply power them as needed. Little thought is given to memory corruption due to power cycling, like with a laptop or desktop computer. Functionality-wise, single-board computers like the Raspberry Pi straddle the fence between these two worlds—and can (unfortunately) be susceptible to memory corruption if shut down at the wrong time.
This makes Raspberry Pi battery usage a somewhat dicey proposition—when the battery dies, the Pi needs to first be shut down safely. Additionally, if there was a way to wake the Pi up at a certain time (perhaps even adding an RTC module to the mix to make up for the Pi’s lack of one) that could be quite helpful in many situations.
The PiJuice HAT adds all this functionality and more to your Raspberry Pi, in a convenient pluggable HAT (Hardware On Top) format. Its impressive set of features makes it one of the most comprehensive power supply options available, Pi or otherwise. We’ll discuss its abilities, along with a few tradeoffs, in this hands-on review.
Visualizza prodotti correlati
PiJuice HAT Specs
Per the PiJuice GitHub page, here’s an abbreviated list of this HAT’s specs:
· BP7X battery - original battery from Motorola Droid 2 (A955) - 1820mAh
· Microcontroller is an ST Micro STM32F030CCT6 ARM CortexM0, 48MHz, F256KB, R32KB, I2C, SPI, USART, 2.4-3.6V
· Charge IC - BQ24160RGET Charger IC Lithium-Ion/Polymer, 2.5A, 4.2-10V
· Fuel gauge IC - LC709203FQH-01TWG Battery Fuel Gauge, 1-Cell Li-ion, 2.8%
· Compatible with any 4-pin battery on board that can be used with 00-9155-004-742-006 battery contacts from AVX, including the BP7X, BP6X, and any compatible batteries. These include the 1600mAh and 2300mAh ones from CameronSino (CS-MOA853SL and CS-MOA855XL)
· 6-pin breakout header, with two GPIO from the ARM Cortex-M0, Vsys, 5v0, 3v3, GND connections
Note that the STM32F030CCT6 used here has a built-in RTC module. This is what allows the system to wake from standby mode and power up the Pi, when scheduled.
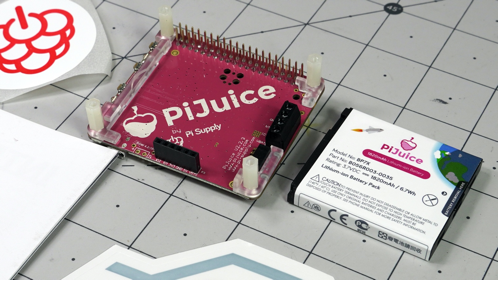
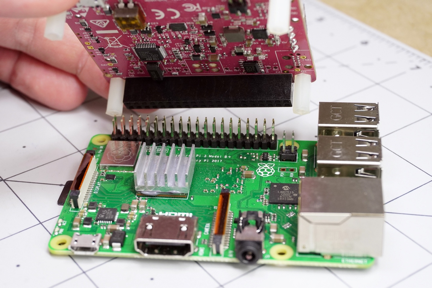
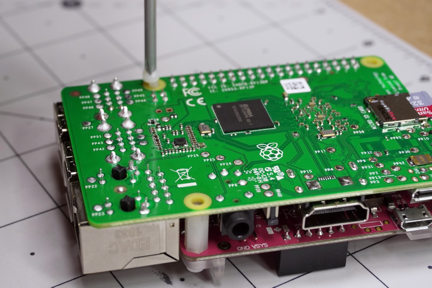
Unboxing the PiJuice HAT, you’ll find a variety of stickers, the HAT itself, the battery, and a bag containing plastic screws and a pogo pin. The standoffs are installed in the same direction as the male header pins, so you’ll need to disassemble and install them on the other side to allow proper attachment to your Pi. Plug the female header in, secure the four plastic screws to the Pi, pop in your battery, and you’re ready to go.
PiJuice Documentation
According to its documentation, the ‘Juice will work straight out of the box, but to take advantage of its full feature set you’ll need to install the companion software. There’s a command line version that can be installed with the terminal command sudo apt-get install pijuice-base, appropriate for headless implementations. There’s also a graphical version that adds a battery icon to your taskbar, installed via the terminal with sudo apt-get install pijuice-gui.
You’ll need to reset after the install, but overall the process is extremely easy. Once the Pi reboots, you can see the charge level visually in the system tray, and get a battery percentage by hovering over it. Right click on the icon, and then choose Settings to give you access to a number of settings options. Clicking on Configure HAT in the first tab brings up yet another settings page, which sets up the HAT’s onboard hardware.
Wake Up Raspberry Pi Configuration
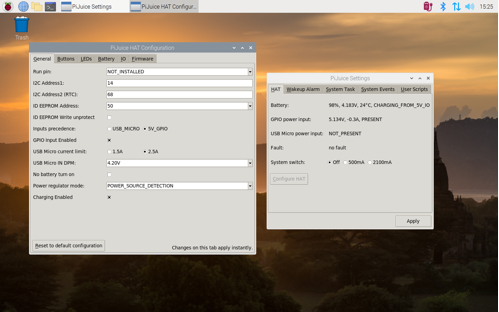
Between these two interfaces, you’re presented with a massive number of configuration options. What seems to be the most generally useful item is the Wakeup Alarm tab, found in the PiJuice Settings interface. Clicking on this tab presents you with the Coordinated Universal Time, or UTC in 24-hour format. Press Set RTC time to set the PiJuice’s real-time clock, which functions independently of the Pi.
You can set alarms to occur at different days, hours, minutes, and seconds, or even after different arbitrary time periods. Checking (or “x-ing”) Wakeup enabled allows the Pi HAT to rouse your Raspberry Pi from a shutdown state. Set Alarm appears to be what actually sets the alarm trigger, though you might as well hit Apply for good measure. With this done, your machine can wake from its slumber at a set interval, then take a picture, perform an action, check in with your network, or whatever you need, before presumably going to back to sleep until it’s needed again.
The alarm can also run without the wakeup function enabled. While it reports back on when it was last run, it (of course) doesn’t power the Pi up. Presumably this would be used to run a script, though I haven’t tested this functionality.
Along with the scheduling, the device can be set up to get a “heartbeat” from your Pi, and restart it if it somehow stops functioning. There are also three configurable buttons, and two—configurable, of course—RGB LEDs. If you haven’t figured it out, the device is a tinkerer’s dream, while offering good basic functionality for those that would rather just have it work.
PiJuice Battery Life
To get an idea of how long your Pi will function without external power, there’s a handy PiJuice Battery Discharge Time Calculator. This allows you to input the battery size, along with your Pi model, and other advanced details, as needed. The Pi 3B+ that I used, for instance, is shown to run for 3.17 hours when idling with the provided 1820 mAh battery, but only 1.88 hours when shooting 1080p video. The 4B, as you would suspect, lasts a shorter amount of time, at 2.03 and 1.59 hours, respectively. Older Pi models can run for longer, due to their reduced specs and power consumption.
PiJuice HAT Tradeoffs
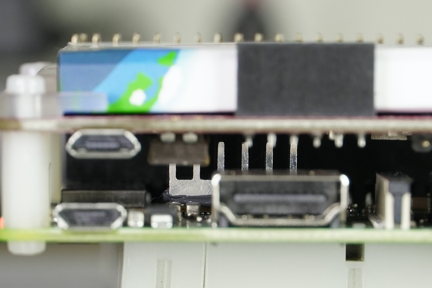
Enough room for a small heat sink
As with any good thing, there are always a few tradeoffs.
· While it’s possible to hot-swap batteries while plugged in, I experienced some erratic behavior while doing so (I was able to successfully remove and replace it later). I suggest powering it down before swapping batteries, if possible. You may also want to check and/or set the RTC after such an operation, as the Pi Juice battery is what backs up the microcontroller’s RTC.
· The PiJuice, like most other HATs, will restrict the kind of cooling solution you can use. A small passive heat sink or an external fan will work, but don’t expect to use a massive ICE Tower (or similar) in the limited space between the two boards. Check out this post if you want to know more about different Pi cooling options.
· Along with the space restriction, some header pins are used for control. It appears that most other HATs will work with the configuration, but it’s something to consider.
· The price for these units is around $90. Depending on your project, that may be totally acceptable or a deal breaker.
For a less expensive, and certainly less capable Pi power management solution, you can simply use ATtiny85 with a relay. You can substitute in a MOSFET for the power relay to create an even more efficient setup.
PiJuice UPS: A Robust Solution
As a UPS, the Pi HAT is more than capable of holding your Pi on through intermittent power outages, and it’s customizable for much more. If your project calls for a robust, full-featured Raspberry Pi battery solution, it’s very much worth a look!


